Show me the way to...
![]()
txt
Show me the way to...
![]()


.png)


This product may not be available in all countries.
The mask contains magnets that may interfere with certain implants or medical devices. Please refer to the Support documents for complete information, including magnet contraindications and warnings.
You can print your ResMed sizing guide here. Remember to print to scale, as you’ll have to cut out your guide from the document you print.
Once you have your sizing guide:
use a mirror and hold the sizing guide to your face. The top of the guide should correspond with the top of your nasal bridge.
the lower part of the guide indicates which mask size is best for your face. The size that aligns with the crease below your lower lip will be your recommended fit.
If you’re between sizes, we recommend selecting the larger option for greater comfort.
As an alternative to using a sizing guide, you can also use a straight ruler to measure the distance from the bridge of your nose (between your eyes) to the dip between your lower lip and your chin. Different measurements correspond to the following sizes:
Between 74-86 mm: Small
Between 86-98 mm: Medium
Between 98-110 mm: Large
Before purchasing or trialling the AirFit F20 mask, your CPAP provider will follow the same process using the sizing guide to help select the mask size that best fits you.
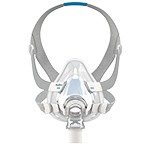
Step 1 - Unclip the EasyClickTM Magnets.
Step 2 - With the mask held against your face, pull the headgear over your head. Ensure the top of the mask cushion is sitting comfortably at the top of your nasal bridge. The bottom of your headgear should settle comfortably at the top of your neck - with the top of the headgear sitting on your crown.
Step 3 - Bring each of the magnets up to meet their corresponding clips on the frame.
Step 4 - Adjust the tabs on the upper headgear straps.
Step 5 - Adjust the tabs on the lower headgear straps.
Step 6 - Connect your device tubing to your mask elbow.
Step 7 - Connect the elbow to your mask.
Step 8 - To ensure your fit will work with your therapy: switch on your device and position yourself as if you are to begin therapy (e.g. lying down in bed).
Step 9 - Adjust your upper straps.
Step 10 - Adjust your lower straps.
Step 11 - Do not overtighten as this may cause discomfort.
Step 12 - Practice reseating your cushion – pull your mask away from your face, allow your cushion to reinflate, and then resettle the inflated cushion so the cushion membrane is sitting at the top of your nasal bridge.
These instructions are for general information purpose only. For full details consult the user guide.
.jpg)
If you have any questions regarding warranty information on our masks, please contact your local customer service team.
Get on the right track with your sleep therapy.
The how, what, where and why…
What does therapy do for you…
Some helpful tips…
Step 1 - Unclip the EasyClickTM Magnets.
Step 2 - With the mask held against your face, pull the headgear over your head. Ensure the top of the mask cushion is sitting comfortably at the top of your nasal bridge. The bottom of your headgear should settle comfortably at the top of your neck - with the top of the headgear sitting on your crown.
Step 3 - Bring each of the magnets up to meet their corresponding clips on the frame.
Step 4 - Adjust the tabs on the upper headgear straps.
Step 5 - Adjust the tabs on the lower headgear straps.
Step 6 - Connect your device tubing to your mask elbow.
Step 7 - Connect the elbow to your mask.
Step 8 - To ensure your fit will work with your therapy: switch on your device and position yourself as if you are to begin therapy (e.g. lying down in bed).
Step 9 - Adjust your upper straps.
Step 10 - Adjust your lower straps.
Step 11 - Do not overtighten as this may cause discomfort.
Step 12 - Practice reseating your cushion – pull your mask away from your face, allow your cushion to reinflate, and then resettle the inflated cushion so the cushion membrane is sitting at the top of your nasal bridge.
Step 1 - Remove elbow from frame by pressing the side buttons and pulling the elbow away.
Step 2 - Unclip the EasyClick Magnets.
Step 3 - Undo upper headgear tabs.
Step 4 - Pull strapping away from frame.
Step 5 - Hold the side of the frame between the upper and lower arms. Gently pull the cushion away from the frame.
Step 1 - Disassemble mask.
Step 2 - Rinse frame, elbow and cushion under running water. Clean each component with a soft brush.
Step 3 - Soak components in warm water with mild liquid detergent (as dishwashing liquid) for up to ten minutes. Beware: do not use strong chemicals.
Step 4 - Shake components in water.
Step 5 - Brush moving parts of elbow and around vent holes.
Step 6 - Brush areas of frame where arms connect, and inside and outside the frame where the elbow connects.
Step 7 - Rinse components under running water.
Step 8 - Leave components to air dry out of direct sunlight – making sure to squeeze the arms of the frame to ensure excess water is removed.
Step 1 - Attach cushion to frame by aligning the circular openings and pushing together until retained.
Step 2 - With the ResMed logo on the headgear facing outside and upright, attach the EasyClick Magnets.
Step 3 - Thread the upper headgear straps into the frame slots from the inside. Fold them over to secure.
Step 4 - Connect elbow to mask frame.
These instructions are for general information purpose only. For full details consult the user guide.
.jpg)
Starting therapy can seem daunting. Let us help you get started with the right frame of mind.
Leak often occurs when your mask’s seal is compromised by movement, incorrect fitting or improper sizing.
To find a source of leak, run your finger along the edge of your mask’s seal. Once located, adjust your headgear. Resolve any leak in the upper part of your mask by adjusting your upper straps.
Resolve lower mask leak with your lower straps.
Do not overtighten as this may cause discomfort.
If leak persists, with your device still switched on, reseal by briefly pulling your mask away from your face, letting your cushion reinflate, and resettling your mask cushion so the cushion membrane is sitting at the top of your nasal bridge.
If leak continues, you may need a different size mask. Try our sizing guide or speak to your CPAP provider about using a different sized mask.
Your mask should be checked regularly for signs of damage and deterioration.
When cleaning your mask, you should also check each component for damage. Your cushion, frame, tubing, elbow and headgear should all be regularly checked for cracks and tears.
If any component of your mask is cracked or torn, it may be damaged and in need of replacement.
We also recommend that you regularly replenish your mask cushion.
Step 1 - Disassemble mask.
Step 2 - Rinse frame, elbow and cushion under running water. Clean each component with a soft brush.
Step 3 - Soak components in warm water with mild liquid detergent (as dishwashing liquid) for up to ten minutes. Beware: do not use strong chemicals.
Step 4 - Shake components in water.
Step 5 - Brush moving parts of elbow and around vent holes.
Step 6 - Brush areas of frame where arms connect, and inside and outside the frame where the elbow connects.
Step 7 - Rinse components under running water.
Step 8 - Leave components to air dry out of direct sunlight – making sure to squeeze the arms of the frame to ensure excess water is removed.
Step 1 - Disassemble mask. EasyClick Magnets can remain attached to headgear during cleaning.
Step 2 - Handwash headgear in warm water with mild liquid detergent.
Step 3 - Rinse headgear under running water. Inspect to ensure headgear is clean and detergent free. Wash and rinse again, if necessary.
Step 4 - Squeeze headgear to remove excess water.
Step 5 - Leave headgear to air dry out of direct sunlight.
These instructions are for general information purpose only. For full details consult the user guide.
.jpg)
Our products are designed to make travelling easy. Here are some useful tips.
.jpg)
If you have any questions regarding warranty information on our masks, please contact your local customer service team.
Accessories
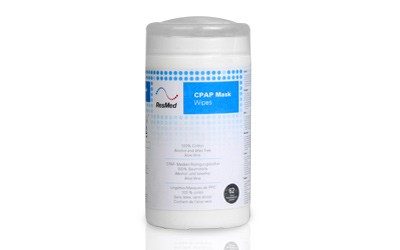
ResMed CPAP Mask Wipes are a fast and easy cleaning solution for any CPAP mask.More information…
More information…From screening to therapy devices and masks, our solution can help you get a better night’s rest. Crafted to offer both confidence and flexibility, our products allow for a high-quality therapy experience catered to your needs.
Our device, mask and accessory ranges enable you to easily customise your therapy experience to your preferences.
.jpg)
.jpg)